How to Create a Clipping Mask in Photoshop?
- 1 What are Masks In Photoshop?
- 2 How do you create a Clipping Mask in Photoshop? Step-by-Step Tutorial –
- 2.1 Step 1: Open Photoshop and Select the Image
- 2.2 Step 2: Create a new layer
- 2.3 Step 2: Select the Tools and the object in the image.
- 2.4 Step 4: Fill in the space you selected
- 2.5 Step 5: Unselect
- 2.6 Step 6: Masking the Image:
- 2.7 Step 7: Moving the image
- 3 Conclusion:
What are Masks In Photoshop?
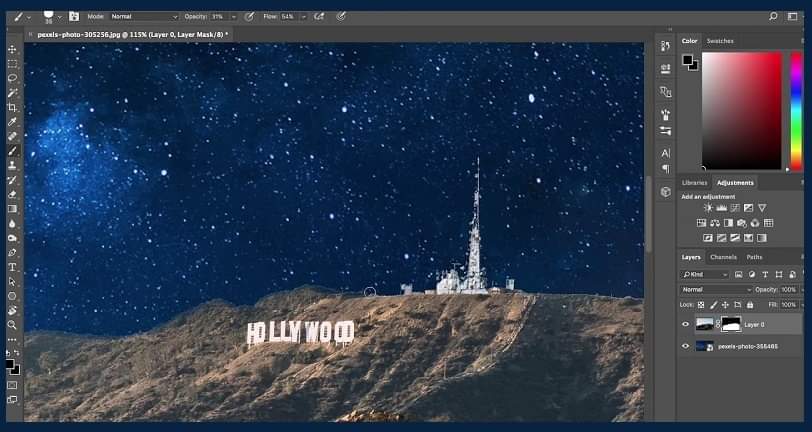
Image masking service has different parts; one is commonly called Clipping Mask. This is the process of getting your picture into a new shape or cutting out particular objects from an image and pasting them to a different background. Some other names and layer masking are known as ma,sks in Phois toshop. Now, what is Layer Masking? Well, let me get the breakdown for you. The clipping mask defines a group of layers to which a mask is applied. The lowermost layer, or base layer, defines the visible boundaries of the whole group. For instance, suppose you’ve got a form within the base layer, a photograph within the layer on top of it, and text within the uppermost layer. If the picture and text seem solely through the form defined within the base layer, they also take on the bottom layer’s opacity.
It is defined as a very efficient way to control the visibility of a layer in Photoshop. That is the reason some people confuse clipping masks with layer masking. Meanwhile, layer masking and clipping masks are two separate things. They may be similar, but they are not the same thing. A layer masking is often termed when adding layers or overlapping one picture with another. The visibility of the layers contrasting there is subtle. On the other hand, Clipping Masks are highly contrasted. It means reshaping an image in your desired form and putting it to set it into a different image.
This may sound slightly confusing initially, but you will soon get the gist as you learn how to create your clipping mask. By learning how to produce a clipping mask in Photoshop, you’ll build new frames for pictures, stunning typography, or custom pic layouts. This technique may help find out. Beginners will mainly enjoy it; even specialists will use this tutorial to discover something new.
In this tutorial, you’ll learn how to form multiple layers, hide them, and use the oshop choice tools to create clipping masks in Photoshop CC.
After following the rules set during this tutorial, you’ll be ready to produce the image masking service of a pro!
How do you create a Clipping Mask in Photoshop? Step-by-Step Tutorial –
Clipping Masking in Photoshop is a lot easier than one may estimate it to be. The process may sound complex, but the overall technique is straightforward. So, as you delve deeper into how it all works, everything will come off easy for you.
Clipping masks are very easy to use and effective, but a jarring step might throw you off at the beginning if you are new to Photoshop. So, let’s get closer and learn how to eliminate mistakes while masking your image.
Step 1: Open Photoshop and Select the Image
Open Photoshop and select your image on Photoshop. After you’ve opened it, the image will be placed on the Background Layer automatically. A key thing to remember is that the background layer is locked by default. If you want to unlock it, you can click on the lock symbol and place it right on the symbol name. It will then be converted to Layer 0. Which would mean that you wouldn’t have many layers? As you have unlocked this layer, you can go to the next step and change the image to create clipping masks.
Step 2: Create a new layer
It is essential to have more than one layer to manipulate your image to create a clipping mask. So, while your image is on Layer 0, you must make another layer, referred to as Layer 1. To create a layer, click on the bottom right of the screen where the Layer Panel is placed. Use your mouse to drag and drop this new layer from Layer 0. What you will be left with is Layer 0.
Step 2: Select the Tools and the object in the image.
With Layer 1 decided on from the Layer Panel, use the selection tools to pick a place over the image. You can use any of the selection tools for this purpose.
Your choice determines the scale and form of a clipping mask. Here, we will use the Rectangular Marquee Tool.
Step 4: Fill in the space you selected
Hide the visibility of Layer 0 so that you can see your selection.
To use the chosen place for the clipping mask, we should keep the choice even after it’s far deselected. To do this, we can fill the vicinity with a few shades or patterns. Go to the Edit Menu. Select Fill. Fill the layer with any shade or layout of your choice. We are going to fill the choice with black. This will let you see your choice even once you deselect it.
Step 5: Unselect
Once you’ve crammed your preferred region, you can deselect the layer. To do so, click the Select Menu and select Deselect.
Step 6: Masking the Image:
Going lower back to Layer zero, choose the layer and make it visible. We are going to create clipping masks using the layer with the image. Click on the Layer Menu and pick out Create Clipping Mask. This will robotically convert Layer Zero into the clipping masks for the layer below it. Once you do this, you may have created primary clipping masks in Photoshop. This is as smooth as it gets. At this stage, your clipping masks will appear on the screen. You can upload different layers inside the background. The bottom-maximum layer must include the photo in your background.
Step 7: Moving the image
If you aren’t happy with how your photograph seems in the clipping mask, you’re loose to transport it around. With the Layer 0 selected, use the Move Tool to extrude the photograph’s location in the mask.
Conclusion:
This is how you can create a clipping mask in Photoshop. Learning how to make Photoshop masks can be tricky if you’re a beginner. However, practice is always the key to perfection. If you’ve read the full article, you will know how this works. If you practice hard enough, you can now provide image masking services on your own.


