What Does Initializing a Disk Erase Data Mean? Get the Facts Here!
- 1 What Does Initialize Disk Mean?
- 2 If I Initialize a Disk, Will It Be Erased?
- 3 How to Initialize Disk
- 3.1 Necessary Preparation: Initialize the Disk without Losing the Data
- 3.2 Step 1: Choose the Uninitialized Disk
- 3.3 Step 2: Scan the Disk for Files
- 3.4 Step 3: Preview and Recover Lost Files
- 4 Solution 1: How to Initialize Disk by Disk Management
- 5 Solution 2:Diskpart Initialize Disk
- 6 Why Can’t I Initialize Disk?
- 6.1 Disk is write-protected:
- 6.2 The disk is damaged:
- 6.3 The disk is already initialized:
- 6.4 Incompatible disk format:
- 6.5 Initialize Disk as MBR or GPT
- 7 Conclusion
Many individuals often ask questions such as, “If I initialize a disk, will it be erased?” on Q&A online forums. Yes, initializing a disk can be daunting, especially when you are unsure about its implications on your stored information.
This comprehensive guide will address common concerns and questions related to disk initialization, such as “Does initializing a disk erase data?” and “What does initializing a disk mean?” Additionally, we will offer guidance on safely initialising a disk without losing data. So, if you’ve ever been puzzled by the idea of disk initialization and its potential consequences, read on to gain a clearer understanding of this essential procedure.
What Does Initialize Disk Mean?
Initializing a disk is preparing a storage disk by setting up the necessary data structures and file systems. Its goal is to ensure efficient storage and organization of data. During initialization, a partition table is created to define the disk layout and divide it into logical sections called partitions. A disk partitioning scheme, like MBR (Master Boot Record) or GPT (GUID Partition Table), is selected to enable proper recognition and interaction between the disk and the operating system.
If I Initialize a Disk, Will It Be Erased?
No, initializing a disk does not erase the data on it. Disk initialization prepares a disk by creating the necessary data structures and file systems. However, it’s important to note that if you format the disk during the initialization process, it will erase all the data on the disk. So, exercising caution and backing up any critical data before proceeding with disk initialization is essential.
How to Initialize Disk
Necessary Preparation: Initialize the Disk without Losing the Data
Before learning how to initialize a disk, it is highly recommended to prioritize data recovery from the uninitialized disk. Although initializing a disk does not erase the data, initialization typically involves creating a new file system and partitioning the disk, which can overwrite existing data.
Tenorshare 4DDiG can assist you in initializing data without losing data. This powerful software enables you to recover data from various devices, including laptops, PCs, internal and external drives, USB flash disks, and SD cards. It supports recovering over 1000 file types, encompassing photos, videos, documents, and audio files. Moreover, it specializes in retrieving deleted documents, pictures, and videos from NAS storage. This software has covered whether your files were lost due to accidental deletion, formatting, lost partitions, corruption, system crashes, virus attacks, or other causes.
Step 1: Choose the Uninitialized Disk
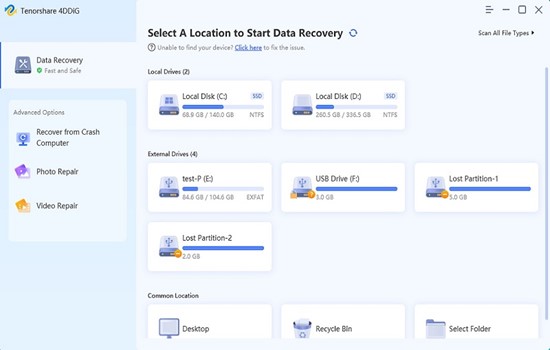
Install and launch 4DDiG on your computer. On the homepage, you’ll find a section called “Devices and Drives.” Look for the uninitialized partition, which may be labelled “Lost Partition” in the user interface. Select it and click on the “Scan” button to proceed.
Step 2: Scan the Disk for Files

4DDiG will begin scanning the selected disk to locate lost or deleted data. A progress bar indicates the scanning process and the extent of thorough checking performed. If you have already found the desired recovery files, you can pause or stop the scan.
Step 3: Preview and Recover Lost Files
You can choose the files you want to recover based on their categories at this stage. Preview the selected files to ensure they are indeed the ones you want to retrieve, and then click on the “Recover” button to initiate the recovery process from your hard drive.
A dropdown box will appear once you click “Recover,” prompting you to select the desired location for saving the recovered files. Choosing a different location from where the files were lost is essential to avoid overwriting the disk and permanent data loss. Select the appropriate location and click OK to proceed.
Just three simple steps: you may no longer worry about how to initialize data without losing data.
Solution 1: How to Initialize Disk by Disk Management
Disk Management is a utility tool in Windows operating systems that allows the initialisation of a new or unallocated disk.
Here are step-by-step instructions on how to initialize a disk using :
- Step 1:Press “Win+ S” on your keyboard and type “Computer Management”. Remember to click “Run as administrator”.

- Step 2: A window will pop up, and then select “Disk Management” from “Storage”.
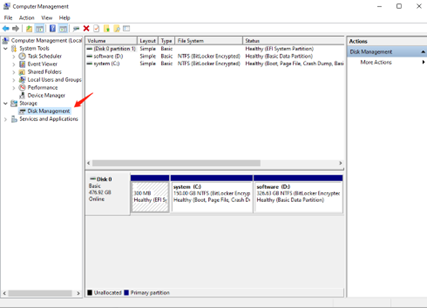
- Step 3:Select and right-click on the disk you want to initialize. Click on “Initialize Disk”.
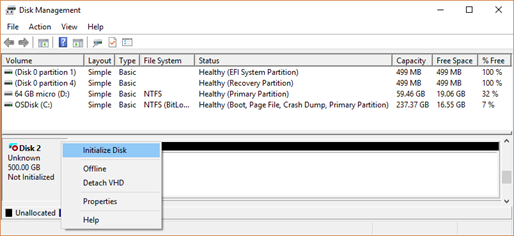
Note: Certain USB drives cannot be initialized; they can only be formatted.
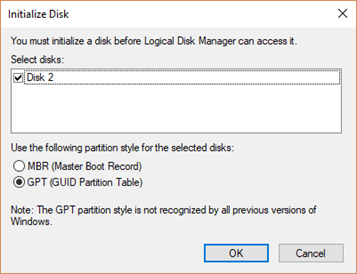
- Step4:Select the desired partition style (MBR or GPT) and Click “OK” to continue. The selected disk will now be initialized. You will see a new partition labelled “Unallocated.”
- Step 5 To use the disk, you must create a partition on the unallocated space. Right-click the unallocated space and select “New Simple Volume” from the context menu.
- Step 6:Follow the on-screen instructions in the New Simple Volume Wizard to specify the volume size, assign a drive letter or mount point and format the partition with a file system (such as NTFS). Click Next to proceed.
- Step 7 Once the partition is created and formatted, it will be assigned a drive letter, and you can now access it through File Explorer.
That’s it! You have successfully initialized the disk using Disk Management.
Solution 2:Diskpart Initialize Disk
Diskpart provides more advanced functionalities than Windows Disk Management. Here’s how to initialize a disk using Diskpart:
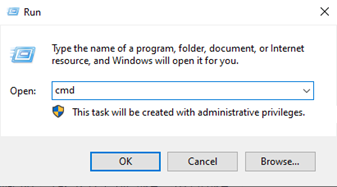
- Step 1: Open the Command Prompt by pressing “WIN+R,” typing “cmd,” and pressing “Enter.”
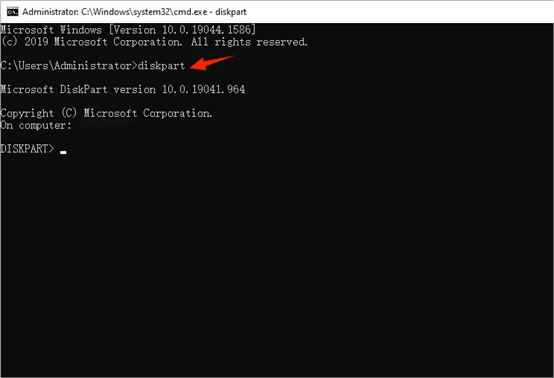
- Step 2: In the Command Prompt window, type “diskpart” and press “Enter” to launch the Diskpart utility.
- Step 3: Enter the following commands one by one and press “Enter” after each command:
- “list disk”: This will display a list of all disks connected to your computer. Note the disk number of the disk you want to initialize.
- “select disk X”: Replace “X” with the disk number you noted in the previous step. This command selects the disk for initialization.
- “attributes cleared successfully” (if prompted): This command clears any attributes that might be set on the disk, allowing you to proceed with initialization.
- “online disk”: This command brings the selected disk online.
- “convert mbr” or “convert gpt”: Choose either command based on the partition style you want to use (MBR or GPT). This command initializes the disk with the specified partition style.
Please note that when using Diskpart to initialize a disk, it directly modifies disk configurations, potentially leading to data loss if not used correctly. Therefore, it is crucial to have a backup of any critical data before proceeding with disk initialization. If you want to initialize a disk without losing data, you can easily use Tenorshare 4DDiG to recover lost files.
Why Can’t I Initialize Disk?
There could be several reasons why you can’t initialize a disk. Here are a few possible explanations:
Disk is write-protected:
Some storage devices, such as USB drives, have a physical switch that can be used to turn on or off write access. If the disk is write-protected, you won’t be able to initialize it until the write protection is removed.
The disk is damaged:
If the disk has physical damage or logical errors, you may be prevented from initializing it. Physical damage could include issues with the disk’s circuitry or mechanical components, while logical mistakes may arise from corrupted file systems or partition tables.
The disk is already initialized:
It’s possible that the disk has already been initialized and contains data or partitions. In such cases, attempting to initialize it again may not be necessary or feasible, depending on the specific circumstances.
Incompatible disk format:
Different operating systems and file systems have their specific disk formats. The process may fail if you’re trying to initialize a disk with an incompatible format. For example, initialising a Mac-formatted disk on a Windows computer might encounter difficulties.
If you can’t initialize the disk after trying the abovementioned methods, you might consider seeking technical support or consulting with a professional.
Initialize Disk as MBR or GPT

If you are wondering whether to initialize the disk as MBR or GPT, you can choose based on your specific needs and system requirements. Here are some factors to consider when deciding how to initialize the disk as MBR or GPT:
Conclusion
Does initializing a disk erase data? After reading the article, you will no longer have such doubts. Initializing a disk does not inherently erase data. By following the proper steps and making informed choices, you can initialize a disk without losing data. Additionally, if you forget to back up your files during the disk initialization process, 4DDiG is one of the best options for returning your essential data.