Complete Guide to Setting Up a Proxy Server on Windows 8
- 1 How to Set Up a Proxy Server in Windows 8
- 1.1 Step 1: Access Network and Sharing Center
- 1.2 Step 2: Open Internet Options
- 1.3 Step 3: Configure Proxy Settings
- 1.4 Step 4: Apply and Save Settings
- 1.5 Testing the Proxy Server Configuration
- 2 Alternative Methods for Configuring a Proxy on Windows 8
- 2.1 1. Using Command Prompt
- 2.2 2. Configuring Proxy through Registry Editor
- 2.3 3. Using Group Policy Editor
- 2.4 4. Setting Up Proxy via Browser Settings
- 2.5 5. Using Proxy Software
- 2.6 FAQs
- 2.6.1 What is a proxy server, and why should I use one?
- 2.6.2 Can I set up a proxy server for specific applications only?
- 2.6.3 How do I know if my proxy server is working correctly?
- 2.6.4 What are the differences between HTTP, HTTPS, and SOCKS proxies?
- 2.6.5 Is it possible to use a free proxy server?
- 2.6.6 How do I turn off the proxy server if I no longer need it?
In today’s digital age, where online security and privacy are paramount, configuring a proxy server can be a vital step in protecting your data and bypassing geographical restrictions. Windows 8, one of Microsoft’s popular operating systems, offers users the capability to set up a proxy server easily. This guide will walk you through the process of setting up a proxy server on Windows 8, providing detailed, step-by-step instructions and exploring alternative methods for configuration.
How to Set Up a Proxy Server in Windows 8
You will need a proxy server to start the setup. If you don’t have your server, check out Proxy5.net. They offer high-quality and easy-to-use proxy servers for Windows 8. Setting up a proxy server on Windows 8 involves a series of straightforward steps. Here’s a detailed guide to help you configure your proxy settings:
Step 1: Access Network and Sharing Center
- Open Control Panel: Click on the Start button and select Control Panel from the menu.
- Navigate to Network and Internet: In the Control Panel window, click on “Network and Internet”.
- Open Network and Sharing Center: Select “Network and Sharing Center” from the options available.
Step 2: Open Internet Options
- Select Internet Options: In the Network and Sharing Center, look for and click on “Internet Options,” located at the bottom left corner.
- Navigate to Connections Tab: In the Internet Properties window, select the “Connections” tab.
Step 3: Configure Proxy Settings
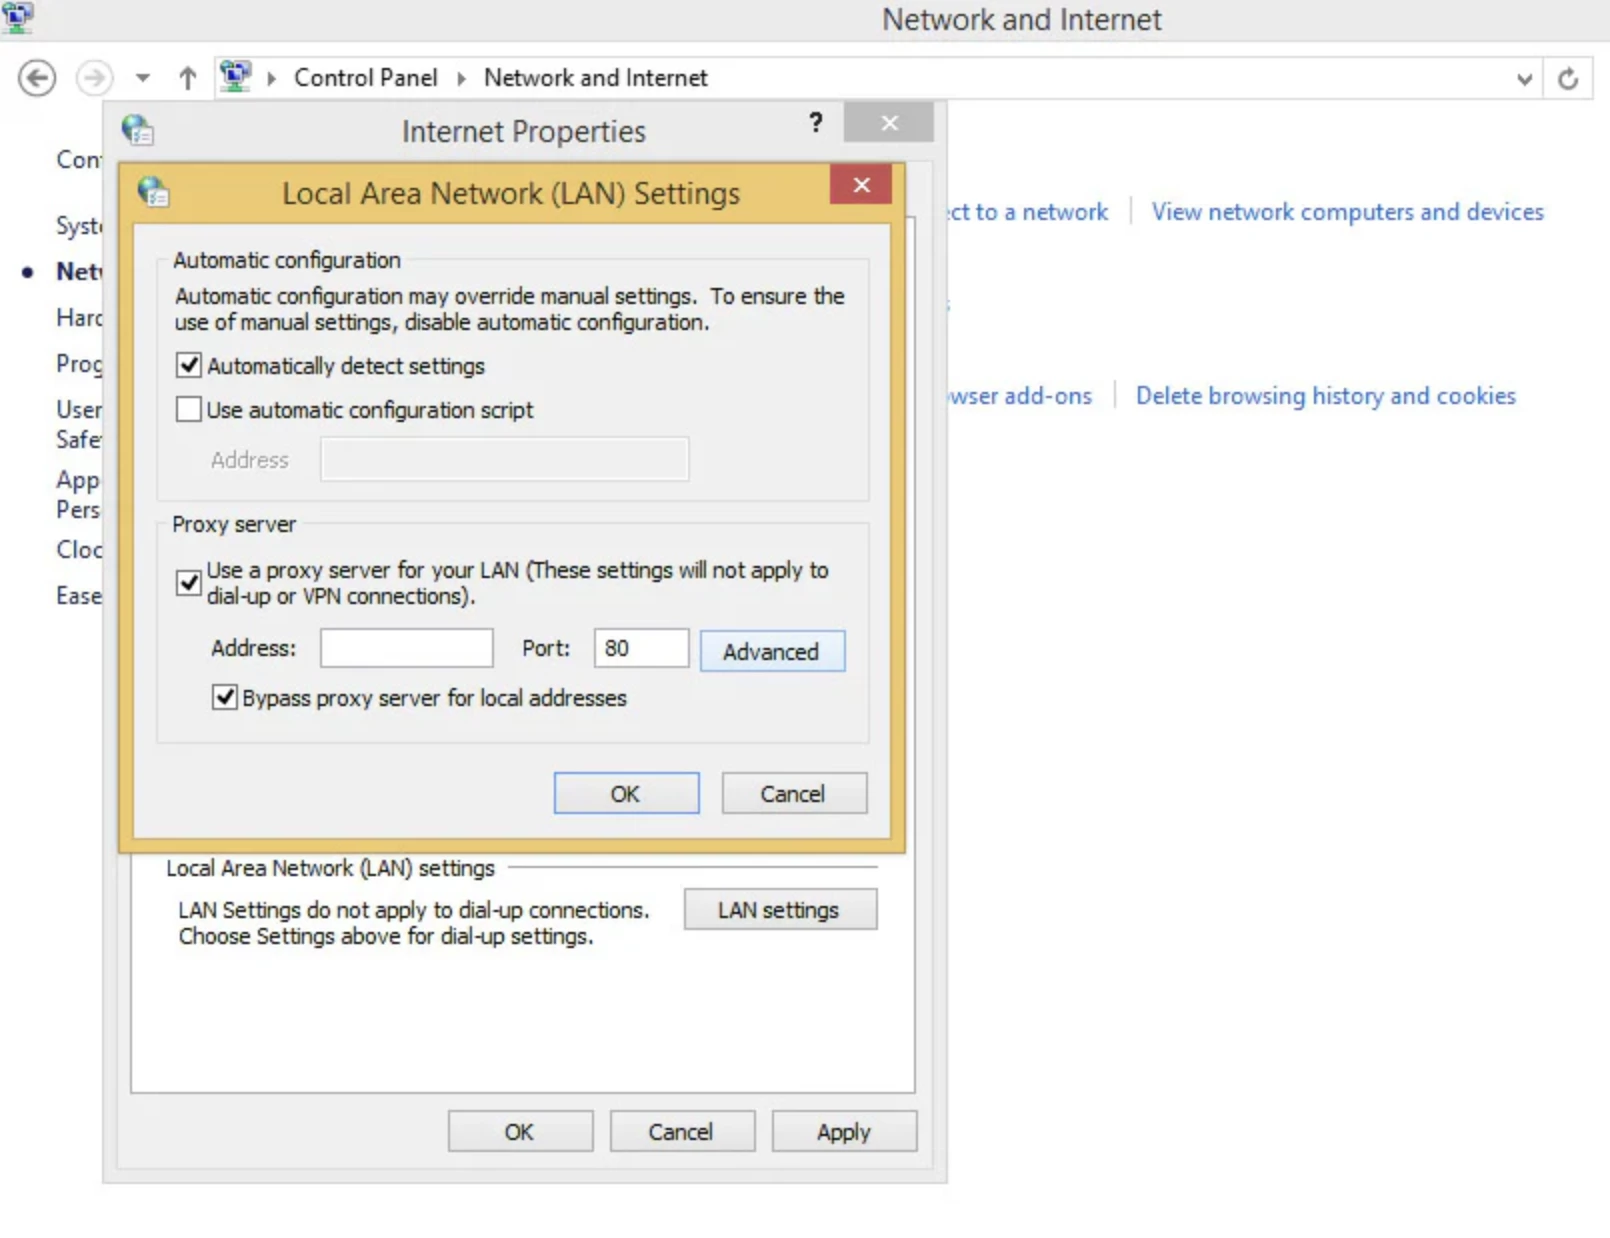
- Click on LAN Settings: Under the Connections tab, click on “LAN settings.”
- Enable Proxy Server: In the Local Area Network (LAN) Settings window, check the box next to “Use a proxy server for your LAN”.
- Enter Proxy Server Address and Port: Input the address of your proxy server in the “Address” field and the port number in the “Port” field.
- Bypass Local Addresses: If you want to bypass the proxy server for local addresses, check the box next to “Bypass proxy server for local addresses.”

Step 4: Apply and Save Settings
- Click OK: After entering your proxy details, click the “OK” button to save the settings.
- Confirm Changes: Click “Apply” and then “OK” in the Internet Properties window to confirm and apply the changes.
Testing the Proxy Server Configuration
- Open a Web Browser: Launch your preferred web browser (e.g., Internet Explorer, Chrome, Firefox).
- Access a Website: Enter a URL in the address bar to check if your proxy settings are working correctly.
- Verify Proxy Usage: Use an online service to verify your IP address and ensure that it reflects the proxy server’s IP.
Alternative Methods for Configuring a Proxy on Windows 8
Aside from the standard method outlined above, there are several alternative ways to configure a proxy server on Windows 8. Here are some additional methods:
1. Using Command Prompt
- Open Command Prompt: Press Win + R, and type cmd, and press Enter.
- Enter Proxy Command: Use the command netsh winhttp set proxy proxy server=”http=your.proxy.address:port“.
- Verify Configuration: Check the proxy settings by running netsh winhttp show proxy
2. Configuring Proxy through Registry Editor
- Open Registry Editor: Press Win + R, type regedit, and press Enter.
- Navigate to Proxy Settings: Go to HKEY_CURRENT_USER\Software\Microsoft\Windows\CurrentVersion\Internet Settings.
- Edit ProxyEnable and ProxyServer: Set ProxyEnable to 1 and input your proxy address and port in ProxyServer.
3. Using Group Policy Editor
- Open Group Policy Editor: Press Win + R, type gpedit.msc, and press Enter.
- Navigate to Proxy Settings: Go to User Configuration -> Administrative Templates -> Windows Components -> Internet Explorer.
- Configure Proxy Settings: Enable and configure the “Prevent changing proxy settings” policy to set your proxy.
4. Setting Up Proxy via Browser Settings
- Open Browser Settings: Access the settings menu in your web browser (e.g., Chrome, Firefox).
- Navigate to Network Settings: In the settings, look for “Network” or “Connections” and find the proxy configuration section.
- Input Proxy Details: Enter your proxy server address and port in the appropriate fields.
5. Using Proxy Software
- Download Proxy Software: There are several third-party applications available for managing proxy settings (e.g., Proxifier, CCProxy).
- Install and Configure: Install the software and configure the proxy settings within the application.
Among these alternative methods, using the Command Prompt or browser-specific settings can often be the simplest and quickest way to configure a proxy server. However, for more advanced or network-wide settings, using the Registry Editor or Group Policy Editor provides greater control and customization options. Proxy software offers a user-friendly interface and additional features, making it an excellent choice for those who prefer an all-in-one solution.
FAQs
What is a proxy server, and why should I use one?
A proxy server acts as an intermediary between your computer and the internet, helping to enhance privacy, security, and access to restricted content. Using a proxy can hide your IP address, encrypt your internet activities, and allow access to websites blocked in your region.
Can I set up a proxy server for specific applications only?
Yes, specific applications, such as web browsers or torrent clients, allow you to configure proxy settings individually. This way, only the traffic from those applications will go through the proxy server.
How do I know if my proxy server is working correctly?
You can verify if your proxy server is functioning correctly by visiting websites like whatismyip.com to check if your IP address matches the one provided by your proxy server.
What are the differences between HTTP, HTTPS, and SOCKS proxies?
HTTP proxies are used for web traffic, HTTPS proxies provide secure, encrypted connections, and SOCKS proxies can handle all types of traffic, including email, FTP, and torrenting.
Is it possible to use a free proxy server?
Yes, there are many free proxy servers available online. However, they may not be as reliable or secure as paid services. Free proxies often have slower speeds and may pose security risks.
How do I turn off the proxy server if I no longer need it?
To turn off the proxy server in Windows 8, go back to the LAN settings in Internet Options and uncheck the box next to “Use a proxy server for your LAN”. Then, click OK to apply the changes.
Setting up a proxy server on Windows 8 is a straightforward process that can significantly enhance your online privacy and security. Whether you follow the standard method using Internet Options or explore alternative methods such as Command Prompt, Registry Editor, or specialized software, configuring a proxy server is within reach for any user. By understanding and utilizing these methods, you can ensure a safer and more versatile internet experience.


